Grilled Cheese Roll Ups That Are Crispy, Gooey, and So Easy

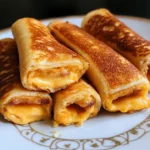
Grilled Cheese Roll Ups are the kind of snack that makes the kitchen go quiet for about three seconds, right before everyone starts asking for another one. They’re buttery, crisp, golden little tubes of melted cheese, and honestly, they feel way more exciting than regular grilled cheese even though they use the same cozy basics.
The first time I made Grilled Cheese Roll Ups, I rolled one a little too loosely and watched cheese sneak out into the pan like it had somewhere better to be. Not a tragedy, though. That crispy cheese edge became the best bite. These are fun, fast, dippable, and perfect with tomato soup, marinara, ranch, or just straight from the skillet while the cheese is still stretchy.
The Crispy, Melty Magic of Grilled Cheese Roll Ups
What makes Grilled Cheese Roll Ups so good is the texture. The bread gets flattened thin, so instead of a soft sandwich middle, you get more golden surface area touching the pan. Every side turns buttery and crisp, while the cheese inside melts into a warm, gooey center.
They’re also just plain fun to eat. Kids love the roll-up shape, adults love the nostalgic grilled cheese flavor, and nobody complains when there’s a little dipping bowl nearby. They work as an after-school snack, a quick lunch, or a casual appetizer when you want something playful without making a whole production out of it.
The trick is keeping the heat gentle. Too hot, and the outside browns before the cheese melts. Medium-low to medium heat gives the bread time to crisp while the cheese softens all the way through.
Simple Ingredients That Make These Roll Ups Work
• Soft sandwich bread – fresh, flexible bread rolls easily and crisps beautifully once buttered.
• Melting cheese – cheddar, American, Monterey Jack, Colby Jack, or provolone all give that creamy, stretchy center.
• Butter – helps the outside turn golden, crisp, and rich without drying out.
• Garlic powder – optional, but it gives the butter a cozy savory smell.
• Paprika – adds a tiny smoky note and a little warmth.
• Dried Italian herbs – lovely if you’re serving the roll ups with marinara or tomato soup.
See the recipe card below for the full list of ingredients and measurements.
Rolling and Toasting Without the Mess
Start by trimming the crusts from the bread. I know, it feels a little fussy, but it really does help the bread flatten and roll without cracking. Press each slice thin with a rolling pin, working gently so it doesn’t tear.
Lay the cheese near one edge, leaving a little room around the sides so it doesn’t spill everywhere once it melts. Roll the bread tightly around the cheese, then set it seam-side down while you finish the rest. That little seam-down rest helps the roll-ups behave themselves.
Brush or spread the outside with butter. Melted butter is easier if you want an even coating, while softened butter works fine if you’re careful. Place the Grilled Cheese Roll Ups seam-side down in a warm nonstick skillet. Let that first side seal and turn golden before rolling them around with tongs.
Keep turning until all sides are crisp and the cheese is fully melted. A little cheese may bubble out, and honestly, that’s part of the charm. Those crispy bits are cook’s reward.
Little Fixes for Better Grilled Cheese Roll Ups
Use very soft bread. Dry or crusty bread tends to split when rolled.
Don’t overfill the center, even when the cheese pull temptation is strong. A neat slice or modest line of shredded cheese melts better and makes less mess.
Cook in batches if needed. Crowding the pan traps steam, and steam is the enemy of that crisp buttery shell.
Serve Grilled Cheese Roll Ups right away. They’re best hot, crunchy, and melty, especially with tomato soup for dipping.
Recipe Card: Grilled Cheese Roll Ups Recipe
Author: Katherine
Yield: 8 roll-ups
Serving Size: One normal portion
Prep Time: 10–15 minutes
Cook Time: 5–8 minutes per batch
Total Time: Approximately 15–25 minutes
Calories: 350–450 per serving
Ingredients
- 8–10 slices soft white sandwich bread, crusts removed
- 8–10 slices melting cheese, such as cheddar, American, Monterey Jack, Colby Jack, or provolone
- 4–5 tablespoons unsalted butter, softened or melted
- Optional: 1/4 teaspoon garlic powder mixed into the butter
- Optional: a pinch of paprika
- Optional: a small sprinkle of dried Italian herbs
Instructions
- Cut the crusts from each bread slice, then flatten every slice with a rolling pin until thin and flexible.
- Place a slice of cheese near one edge of each flattened bread slice. Trim the cheese slightly if it hangs over the edges.
- Add optional paprika or dried herbs over the cheese, if using.
- Roll each slice tightly into a cylinder, starting from the cheese side. Place seam-side down while preparing the remaining roll ups.
- Brush each roll with melted butter, or gently spread softened butter over the outside.
- Warm a nonstick skillet or griddle over medium-low to medium heat.
- Place the Grilled Cheese Roll Ups seam-side down in the pan. Cook for 2–4 minutes, until the first side is golden and sealed.
- Turn with tongs and continue cooking each side for 1–2 minutes, until evenly crisp and the cheese is melted.
- Remove from the skillet and serve immediately while hot and gooey.
Conclusion
There’s something ridiculously comforting about pulling a hot batch of Grilled Cheese Roll Ups straight from the skillet and hearing that crisp buttery crunch on the first bite. The melted cheese center stays soft and gooey, while the outside turns perfectly golden and crisp. They’re simple enough for busy afternoons but fun enough to feel a little special at the table. Pair them with warm tomato soup, marinara, or a handful of crunchy pickles, and they disappear fast every single time.
FAQs about Grilled Cheese Roll Ups
Can I make Grilled Cheese Roll Ups ahead of time?
Yes, you can prepare the roll ups a few hours ahead and keep them covered in the refrigerator before cooking. For the best texture, cook them fresh right before serving. Once cooked, they taste best while still warm and crispy.
What cheese works best for grilled cheese roll ups?
Cheeses that melt smoothly work best. Cheddar, American, Monterey Jack, Colby Jack, and provolone all give a creamy center and nice stretch. Mixing two cheeses together also adds extra flavor.
How do I store leftover Grilled Cheese Roll Ups?
Store leftovers in an airtight container in the refrigerator for up to 3 days. Reheat them in a skillet, air fryer, or oven to bring back the crisp texture. Microwaving works, but the bread becomes softer.
Can you freeze grilled cheese roll ups?
Yes, these freeze surprisingly well. Let them cool completely, then freeze in a single layer before transferring to a freezer-safe bag or container. Reheat directly from frozen in the oven or air fryer until hot and crispy again.
Grilled Cheese Roll Ups
These Grilled Cheese Roll Ups turn soft sandwich bread, melty cheese, and buttery skillet heat into a crisp, cozy snack made for dipping.
- Prep Time: 10-15 minutes
- Cook Time: 5-8 minutes per batch
- Total Time: Approximately 15-25 minutes
- Yield: 8–10 roll-ups 1x
- Category: Snack
- Method: Skillet
- Cuisine: American
Ingredients
- 8–10 slices soft white sandwich bread, crusts removed
- 8–10 slices melting cheese, such as cheddar, American, Monterey Jack, Colby Jack, or provolone
- 4–5 tablespoons unsalted butter, softened or melted
- 1/4 teaspoon garlic powder, optional, stirred into the butter
- Pinch of paprika, optional
- Small sprinkle of dried Italian herbs, optional
Instructions
- Slice the crusts off the bread, then press each piece thin with a rolling pin until it is flexible and easy to roll.
- Set one cheese slice near the edge of each flattened bread slice. Trim the cheese if it reaches past the bread.
- Add paprika or dried herbs over the cheese, if using.
- Roll the bread tightly around the cheese to form a small cylinder. Place each one seam-side down while you finish the rest.
- Coat the outside of each roll with melted butter using a brush, or spread softened butter lightly over the surface.
- Warm a nonstick skillet, griddle, or frying pan over medium-low to medium heat.
- Place the rolls seam-side down in the pan, working in batches if needed so they have room to crisp.
- Cook for 2-4 minutes on the first side, until sealed and golden.
- Turn with tongs and cook each remaining side for about 1-2 minutes, until the bread is crisp all around and the cheese has melted. Total skillet time is usually 5-8 minutes per batch.
- Transfer to a plate and serve right away while the centers are hot and gooey.
Notes
- Very soft, fresh sandwich bread rolls more neatly and is less likely to split.
- Keep the cheese layer modest so the rolls stay tidy in the skillet.
- Medium-low to medium heat helps the bread brown slowly while the cheese melts inside.
- A little cheese may escape into the pan; those crisp edges are part of the fun.
- Serve with tomato soup, marinara, ketchup, ranch, or honey mustard for dipping.
Nutrition
- Serving Size: One Normal Portion
- Calories: 350-450
- Sugar: 3-5g
- Sodium: 600-800mg
- Fat: 20-28g
- Saturated Fat: 10-15g
- Carbohydrates: 25-35g
- Fiber: 1-2g
- Protein: 12-18g
- Cholesterol: 50-70mg
Keywords: Grilled Cheese Roll Ups, cheese roll ups, grilled cheese snack, easy skillet snack, tomato soup dipper