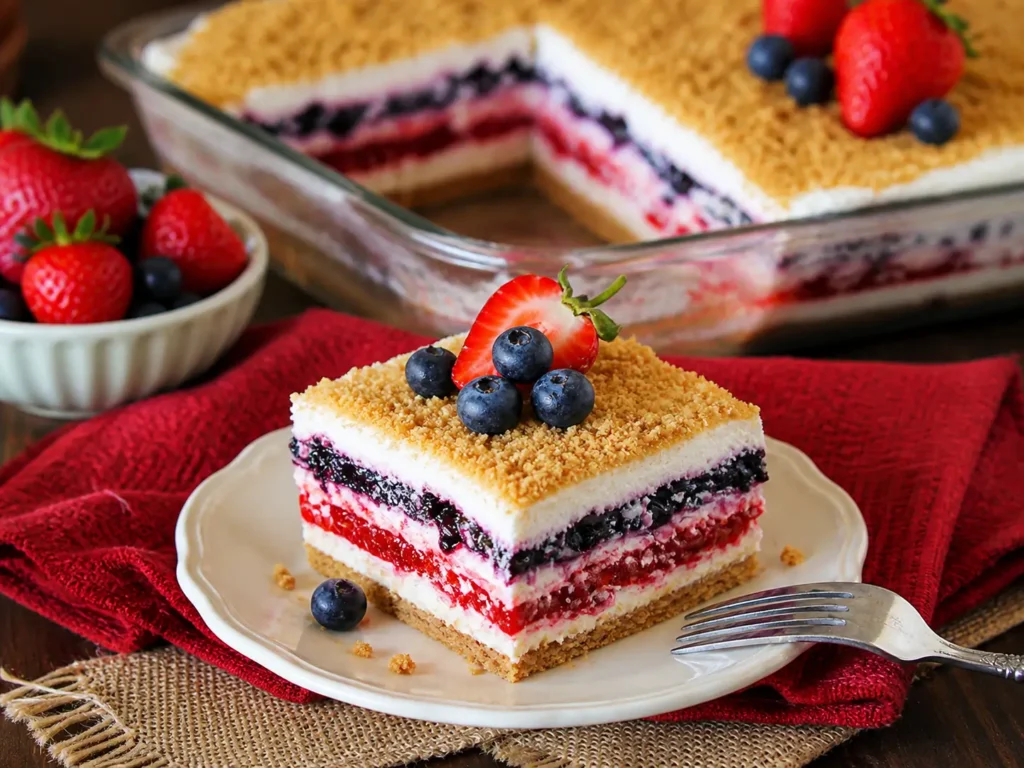
Red White & Blue Mixed Berry Delight
There’s something about a chilled, creamy dessert layered with fresh berries that instantly takes me back to long summer afternoons—paper plates, melting ice in glasses, and that one dish everyone quietly hopes doesn’t run out too fast. This Red White & Blue Mixed Berry treat has become one of those recipes I keep coming back to, especially when the weather turns warm and the berries are at their sweetest.
It’s light but indulgent, simple but somehow still feels a little special. And honestly, the first time I made it, I nearly ate half the pan straight from the fridge before it even made it to the table. No regrets.
A Summer Dessert That Always Steals the Show
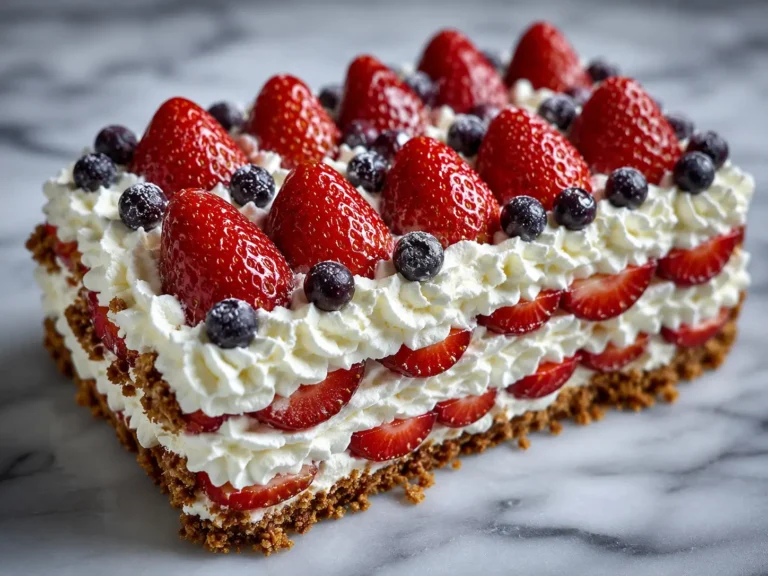
This Red White & Blue Mixed Berry creation isn’t just about looks—though those bright layers definitely turn heads. It’s the balance of textures and flavors that makes it unforgettable. You get that buttery, slightly crumbly base, followed by a smooth, creamy middle, and then bursts of juicy berries on top.
I’ve brought this to backyard barbecues, family gatherings, and even a last-minute potluck where I barely had time to chill it properly—and every single time, someone asks for the recipe.
What makes it so irresistible?
It’s the contrast. The creamy layer melts in your mouth, while the berries add just enough tartness to keep things from feeling too heavy. And because it’s served cold, it’s incredibly refreshing on a hot day.
Ingredients That Bring This Berry Dessert to Life
Here’s where the magic starts. Each ingredient plays its part, and while the list is simple, the result is anything but.
- Graham cracker crumbs – create that buttery, slightly crunchy base that holds everything together.
- Butter – binds the crust and adds richness that balances the tangy filling.
- Cream cheese – gives the dessert its signature creamy texture and a subtle tang.
- Powdered sugar – sweetens the filling while keeping it silky smooth.
- Whipped topping – lightens the mixture and adds that fluffy, cloud-like feel.
- Strawberries – bring sweetness and a vibrant red color to the top layer.
- Blueberries – add juicy bursts of flavor and a deep blue contrast that makes the dessert pop.
See the recipe card below for the full list of ingredients and measurements.
Layering the Perfect Red White & Blue Mixed Berry Dessert
Putting this together feels almost therapeutic. There’s no complicated technique—just a few simple steps that come together beautifully.
Building the base
Start by pressing the graham cracker mixture into your dish. I like to really pack it down so it holds firm once chilled. The smell alone—warm butter and crumbs—always reminds me of pie crust in the making.
Creating the creamy middle
Next comes the cream cheese layer. It should be smooth and spreadable, almost like frosting. If it’s too stiff, it won’t glide over the crust easily (learned that the hard way once when I got impatient and didn’t soften the cream cheese enough).
Fold in the whipped topping gently—this is what gives the filling that airy texture. Spread it evenly over the crust, taking your time to get those edges just right.
Adding the berry topping
Now for the fun part. Scatter the strawberries and blueberries over the top. You can go rustic and toss them on, or take a few extra minutes to arrange them in neat rows for that classic red, white, and blue look.
Either way, once those berries hit the creamy layer, it already starts to look like something worth showing off.
Chill and wait (the hardest part)
Let it chill until everything sets. This step matters more than you think—it gives the layers time to firm up and makes slicing so much easier. I’ve rushed this before, and while it still tasted amazing, it didn’t quite hold its shape.
Tips for Getting That Perfect Texture Every Time
There are a few little tricks that make a big difference with this Red White & Blue Mixed Berry dessert.
Soften your cream cheese properly
Cold cream cheese can turn lumpy fast. Let it sit out until it’s soft enough to blend smoothly. It’s a small step, but it saves a lot of frustration later.
Don’t overmix the filling
Once you add the whipped topping, fold gently. Overmixing can deflate that light, fluffy texture you’re going for.
Use fresh, ripe berries
The berries are the star here, so quality matters. Look for ones that are sweet and juicy—not too firm, not too mushy.
Chill long enough
I know it’s tempting to dig in early, but giving it enough time in the fridge really transforms the texture. It becomes sliceable, creamy, and perfectly set.
Serving Ideas and Easy Variations
One of the best things about this Red White & Blue Mixed Berry dessert is how adaptable it is. Once you’ve made it once, it’s hard not to start experimenting a little.
Switch up the berries
If strawberries and blueberries aren’t available, you can mix in raspberries or blackberries. It changes the flavor slightly but keeps that fresh, fruity vibe.
Make it extra festive
For holidays, I’ve arranged the berries into patterns—stars, stripes, even simple color blocks. It takes a bit of patience, but the presentation really stands out.
Turn it into individual servings
Instead of one large dish, try assembling it in small cups or jars. It’s great for parties, and everyone gets their own perfectly layered portion.
Add a little crunch on top
Sometimes I sprinkle a few extra crumbs or even chopped nuts over the berries for added texture. It’s a small touch, but it adds another layer of flavor.
Storing and Keeping It Fresh
This dessert holds up surprisingly well in the fridge, which makes it perfect for making ahead.
Refrigeration tips
Keep it covered and chilled. The flavors actually meld together even more after a few hours, making it taste even better the next day.
How long it lasts
It’s best enjoyed within a couple of days while the berries are still fresh. After that, they can start to soften a bit too much.
Avoid freezing
Freezing isn’t ideal for this one. The creamy layer can lose its smooth texture once thawed, and the berries won’t hold up the same way.
There’s something quietly comforting about a dessert like this. It doesn’t rely on fancy techniques or complicated ingredients—just simple layers that come together in a way that feels both nostalgic and satisfying. And every time I make this Red White & Blue Mixed Berry treat, it disappears just a little faster than I expect.
Conclusion
By the time you scoop into that first chilled layer, everything about this dessert just feels right—cool, creamy, and bursting with fresh berry flavor. The way the sweet filling melts into the buttery base while the fruit adds a juicy pop makes every bite worth savoring. This Red White & Blue Mixed Berry treat is the kind of simple pleasure that turns an ordinary moment into something a little more special. Serve it straight from the fridge on a warm day, and watch how quickly it disappears from the table.
More Relevant Recipes
Trifle Cups with Whipped Vanilla Cream Everyone Will Love
FAQs about Red White & Blue Mixed Berry
Can I make Red White & Blue Mixed Berry ahead of time?
Yes, this dessert is actually better when made ahead. Preparing it a few hours in advance allows the layers to set properly and the flavors to blend. Just keep it covered in the refrigerator until serving time.
How should I store leftover Red White & Blue Mixed Berry dessert?
Store leftovers tightly covered in the refrigerator. It stays fresh for up to two days, though the berries may soften slightly over time. For best texture, enjoy it within the first 24 hours.
Can I use frozen berries instead of fresh?
You can, but fresh berries are recommended for the best texture and flavor. Frozen berries tend to release extra moisture as they thaw, which can make the top layer watery. If using frozen, thaw and drain them well first.
Can this dessert be frozen for later?
Freezing is not ideal for this recipe. The creamy layer may lose its smooth consistency after thawing, and the berries can become mushy. It’s best enjoyed fresh from the refrigerator.
Red White & Blue Mixed Berry Delight
A cool, creamy Red White & Blue Mixed Berry dessert with graham crumbs, fluffy cream cheese layers, and sweet strawberry and blueberry filling.
- Prep Time: 30 M
- Total Time: 30 M
- Yield: about 12–14 servings 1x
- Category: No-Bake Desserts
- Method: No-Bake
- Cuisine: American
Ingredients
- Crust:
- 2 1/2 c. graham cracker crumbs
- 12 T. unsalted butter, melted
- Cream Cheese Mixture:
- 2 (8 oz.) packages cream cheese, softened
- 1 c. confectioners’ sugar
- 4 c. whipping cream
- 2 tsp. vanilla extract, divided
- 6 T. granulated sugar
- Mixed Fruit Filling:
- 1 (21 oz.) can strawberry pie filling
- 1 (21 oz.) can blueberry pie filling
Instructions
- Stir the graham cracker crumbs with the melted butter until the crumbs are evenly coated.
- Scoop out 3 tablespoons of the crumb mixture and save it for the topping.
- Press the remaining crumbs firmly into the bottom of a 9×13-inch pan coated with non-stick cooking spray.
- Beat the softened cream cheese with confectioners’ sugar and 1 teaspoon vanilla extract until smooth and creamy.
- In another bowl, whip the whipping cream with granulated sugar and the remaining 1 teaspoon vanilla extract until firm peaks form.
- Gently combine the whipped cream with the cream cheese mixture by hand until fully blended.
- Spread 1/3 of the cream mixture, about 3 cups, over the prepared crust.
- Spoon the strawberry pie filling over the cream layer in large dollops, then carefully spread it into an even layer.
- Add another 1/3 of the cream mixture over the strawberry layer and smooth it to cover completely.
- Spoon the blueberry pie filling over the next cream layer, then gently spread it across the surface.
- Finish with the remaining 1/3 of the cream mixture, spreading it evenly over the blueberry layer.
- Sprinkle the reserved 3 tablespoons graham cracker crumbs over the top.
- Cover the pan and refrigerate overnight before slicing and serving.
Notes
- Premium strawberry and blueberry pie fillings give the fruit layers a fuller berry texture.
- For a shortcut, use 2 (8 ounce each) containers of Cool Whip non-dairy whipped topping in place of the homemade whipped cream.
- Overnight chilling is important because it helps the layers firm up and slice more neatly.
Keywords: red white blue desserts, red white blue yum yum recipe, mixed berry yum yum recipe, 4th of July desserts